VDVLINK: Installing and Running the
VirtualBox version of DV Link
by Orrin WN1Z with help from Dave WA3LXD
This guide represents my progress in getting VDVLINK (the Virtual Box version
of EA5GVK / EA7JCL DV-Link) to work on my Windows and Ubuntu Linux laptops. Last
updated: 15 July 2020.
The last one-quarter of this document consists of configuration instructions
put together by Dave WA3LXD. He wrote this mainly for the Raspberry Pi version
of DV Link, but it is pretty close to what is required for the VDVLINK
VirtualBox (VM) version. I would not have been able to get my VDVLINK
VM going without his help.
This document is a work in progress for me. I don't claim to be an expert.
I read Spanish very well, and so, working with the documents by EA5GVK and
EA7JCL has been very enjoyable.
I have gotten only the following modes to work properly: DMR, NXDN,
YSF, and P25. Have not yet gotten D-Star to work. Comments to me at:
orrin.winton at gmail.com.
Please note that in all the Spanish below, accent marks are missing. Many were
missing in the original Spanish-language text, and I removed the rest of them
when I found that they resulted in bizarre characters (due to my using an
English-language keyboard). [Android devices have very easy-to-use
foreign-language keyboards. Not so most PCs. Changing the default keyboard
within the VM is not something I want to try. I don't need to. Just make
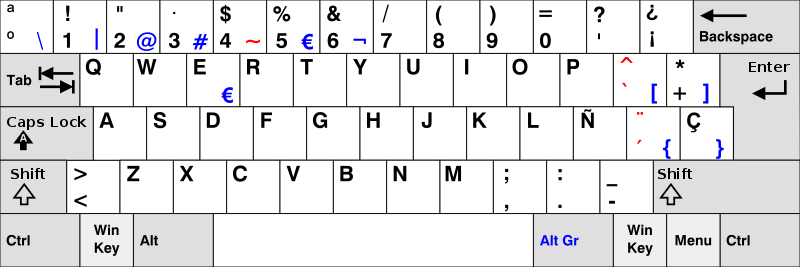
reference to the image of the Spanish keyboard, far down this page.]
Within the VirtualBox virtual machine of
VDVLINK, the keyboard is Spanish. This is no problem -- except for characters
like / : # ' - and _ . These symbols are in locations different from the
English keyboard layout locations. Far down this page, before the WA3LXD
material, is an image of the Spanish keyboard layout. You will need this in
order to find where those symbols are located on the English-US keyboard.
VirtualBox and VDVLINK:
- Download and install the Virtual Box software for Win10 or Ubuntu Linux:
https://go.oracle.com/LP=87691
- Download the Virtual DVLink image (zipped package) from:
http://ea5gvk-dmr.zigor.es/dvlink-v9-change-log/
- My link above should go to the page shown below. If you get a page that shows
a hand holding a mobile device, click on the hand.
Then, go down the page until you find the download link shown below:
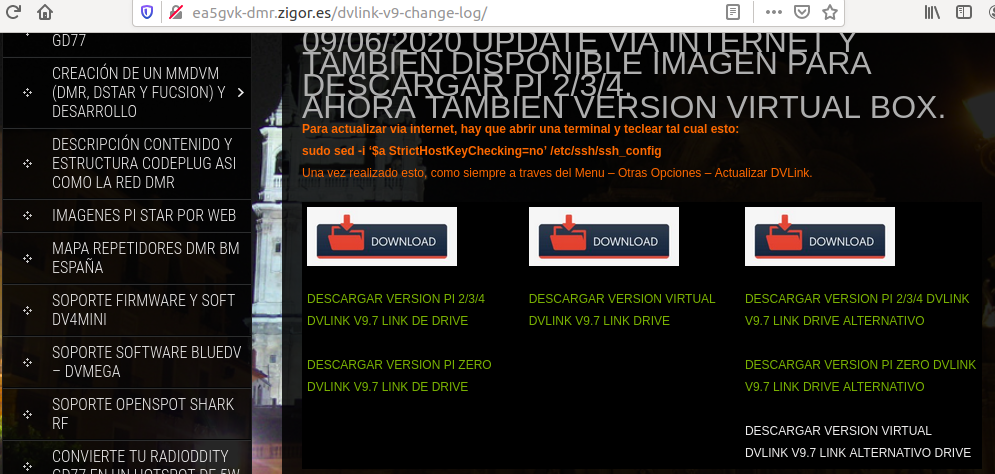
Down the right side of the screenshot above, on the actual website,
Click on "Descargar Version Virtual" (download virtual version) or
"DVLINK V9.7 Link Alternativo Drive " (an alternate download site)
Unzip the .RAR file you just downloaded. You can use UNRAR or WINZIP.
Keep track of where the unzipped file resides.
Start VirtualBox, using the instructions and screenshots below.
The EA5GVK instructions for v8 (version 8) of VDVLINK
seem to be okay for this version 9.7.0. The instructions, in Spanish, are at:
http://ea5gvk-dmr.zigor.es/wp-content/uploads/2020/01/Que-es-Virtual-DVLINK.pdf
The screenshots there are fairly self-explanatory, even though they are in
Spanish, but here are some translations of them for you:
----------
Configuracion Virtual DVLINK v.8 beta
By EA7JCL EA5GVK @BLASMAKERS
Que es Virtual VDVLINK:
Virtual DVLINK es una adaptacion de DVLINK que funciona sobre VIRTUALBOX.
Virtual DVLINK aun es beta, pero se libera para su testeo.
What is Virtual VDVLINK?
Virtual DVLINK is an adaptation of DVLINK that works on VIRTUALBOX.
Virtual DVLINK is still in Beta, but we are releasing it for testing.
----------
En caso de realizar alguna actualizacion o correccion sobre esta beta,
la correccion se publicara en forma de script en la web de EA5GVK y/o por el
canal Telegram generico de DVLINK
When updates or corrections are released, the correction(s) will be
published in the form of a script on the EA5GVK website and/or on the
Telegram channel DVLINK.
----------
Que necesitas para usar VDVLINK:
Ordenador con SO Windows, MacOSX, Solaris o Linux con procesador con soporte
VT. Revisar que este activo VT en bios. Recomendado un 1 Gb asignado a la
maquina virtual. Minimo 700Mb. Espacio en disco libre de 5Gb.
What you need to use VDVLINK:
Computer with OS Windows, MacOSX, Solaris or Linux with a processor that
supports VT [virtualization]. You must check to see if VT is active in BIOS.
It is recommended to assign 1 GB RAM to the virtual machine, minimum 700 MB.
Free space on the disk of 5 GB.
----------
Then the EA5GVK/EA7JCL instructions tell us where to
download, and how to unzip, the VirtualBox application and the VDVLINK
virtual machine. See my instructions above. [I have purposely left out
the author's instructions because he recommends downloading from Google
docs, and then using Google to unzip the file. Google says the file(s)
are too large to unzip, so I am skipping the author's instructions on this.]
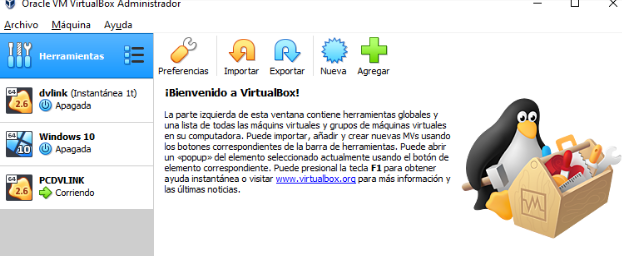
- Install VirtualBox.
- Open the VirtualBox application. You will see something like the
screenshot below:
- Click the icon that says NUEVA (NEW) -- the blazing sun icon --
to create a new virtual machine.
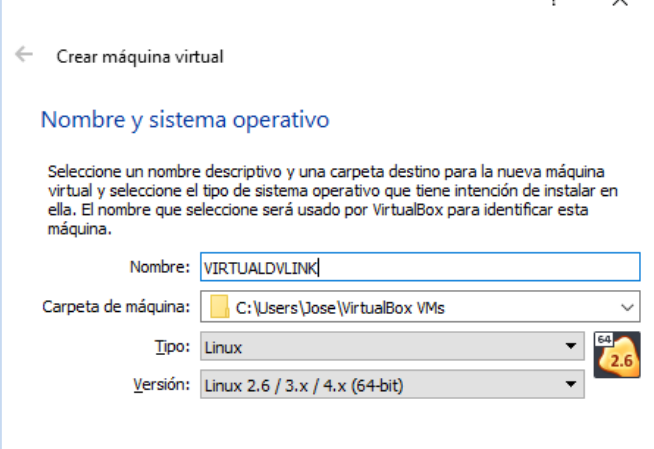
- Below, "Nombre y sistema operativo" should say, in your English version,
"Name and Operating System." Give your new virtual machine (VM) a name.
I called mine VDVLINK. For the moment, leave the other fields alone.
- Hit [NEXT]
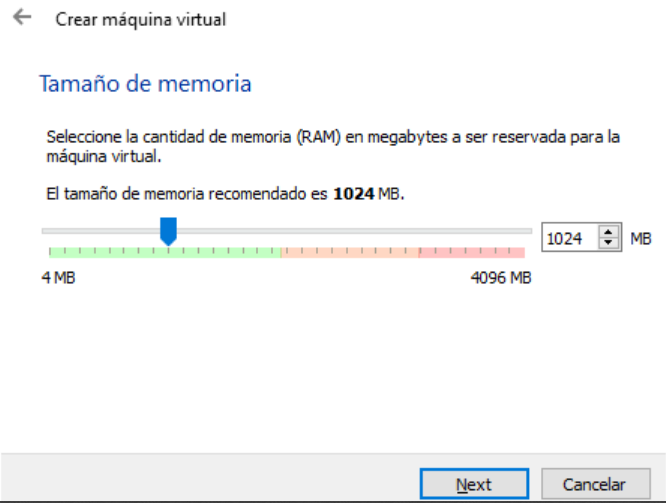
- The screen below asks you to choose the size of memory to be allocated
to the VM. (Tamano de memoria, Memory Size.)Recommended is 1024 MB (one GB).
- [NEXT]
- The next dialog-box: "Hard Disk": Set the radio-button to "Use an Existing
Virtual Hard Disk File." Click the yellow folder icon to look for your VDVLINK
.vdi file which you previously downloaded and unzipped.
- When another dialog appears, click ADD. Your unzipped VDVLinkv9.7.0.vdi
is in a folder in your Downloads directory, if that is where you downloaded
and unzipped it. Remember, you are looking for the .vdi file (which you
previously unzipped), not the compressed file, though they will have similar
names. Double-click the .vdi file. It should then appear in the list of .vdi
files in the dialog box that has the large + plus sign in it. Double-click it.
- The resulting dialog-box should then look like this:
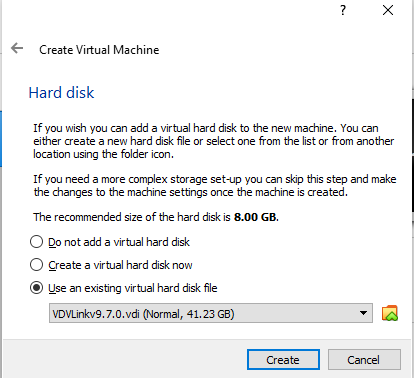
- The .vdi file should be about 41 GB. Hit CREATE.
- The VM is now created, and you are thrown back to the VirtualBox
Manager screen.
- You should now have a VDVLINK entry that says "Powered Off." Don't
double-click it to start it, not yet. Instead, click on SETTINGS at the top
of the Manager.
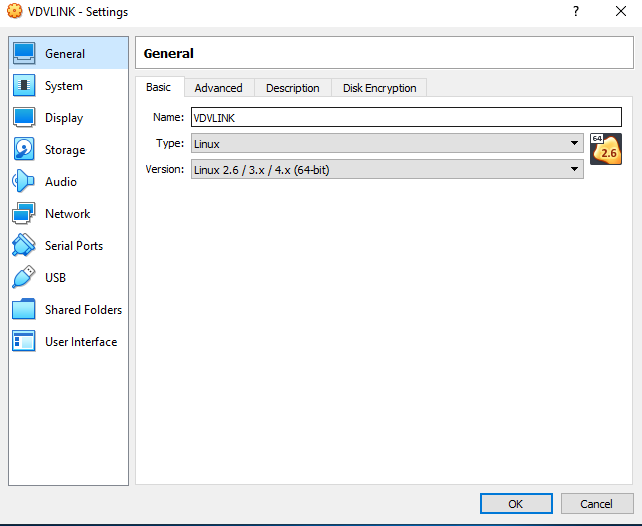
- You will see a screen like the one below. "Name" should be VDVLINK if
that's what you named your VM. Leave this screen alone for the moment.
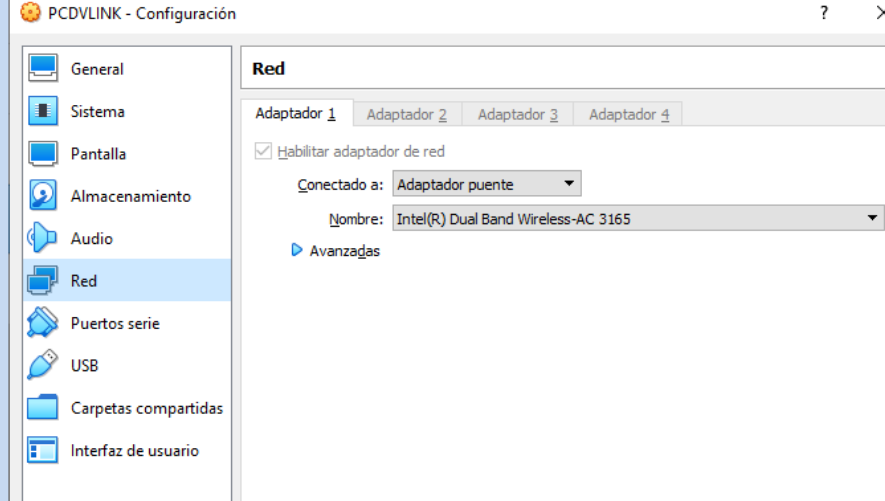
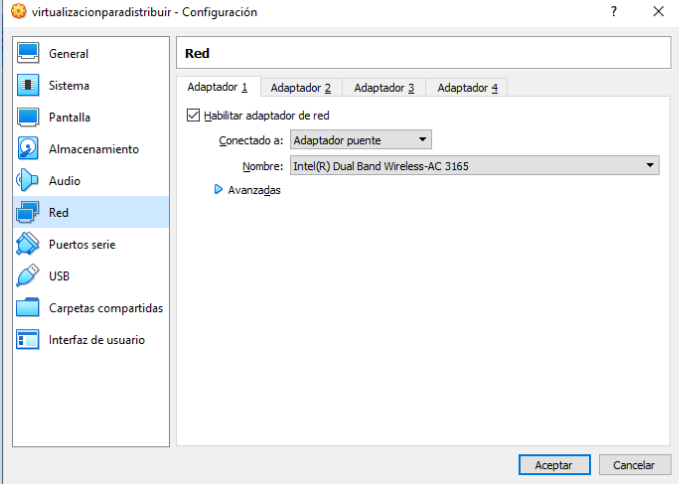
- Next you set the Network settings. "Red" is Spanish for "Network."
Make sure "Enable Network Adapter" (Habilitar adaptador de red) is checked.
Then choose "Bridged Adapter" (Adaptador puente).
Below that, be sure to select your computer's WiFi card from the drop-down
list.
- On the "General" page below, the Name should be what you earlier chose,
such as VDVLINK or whatever. Choose Linux for Type, and Debian (64-bit)
for Version. (The VDVLINK image is a 64-bit Debian Linux operating system
modified to run VDVLINK.)
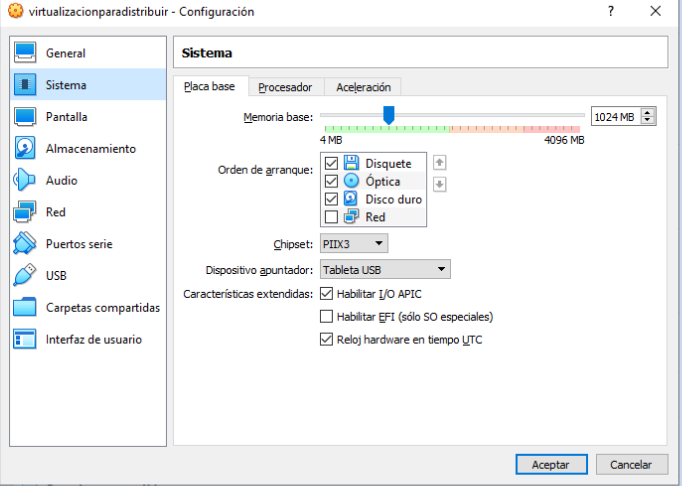
- On the page "System" it should show the 1024MB you chose earlier.
Below that in Spanish "Orden de arranque" means "Boot-up order." I unchecked
"Disquete" (floppy) and left the other two checked. I left "Red" (Network)
unchecked. I left PIIX3, USB Tablet the way they were. Left "Enable I/O APIC"
and "Hardware clock in UTC time" as they were, checked. Left "Enable EFI"
unchecked.
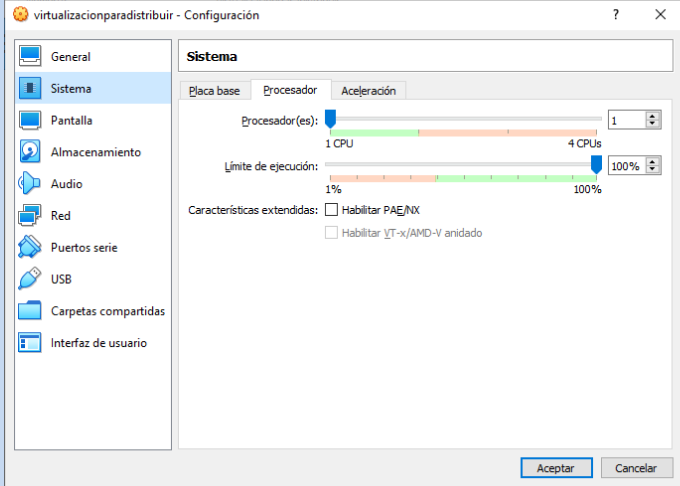
- The "System" page, on the Processor tab (Procesador): I set it for 1 CPU.
So far that has proved to be enough CPU power on my slow laptop. I left the
other setting at 100%. I left the two checkboxes below that unchecked.
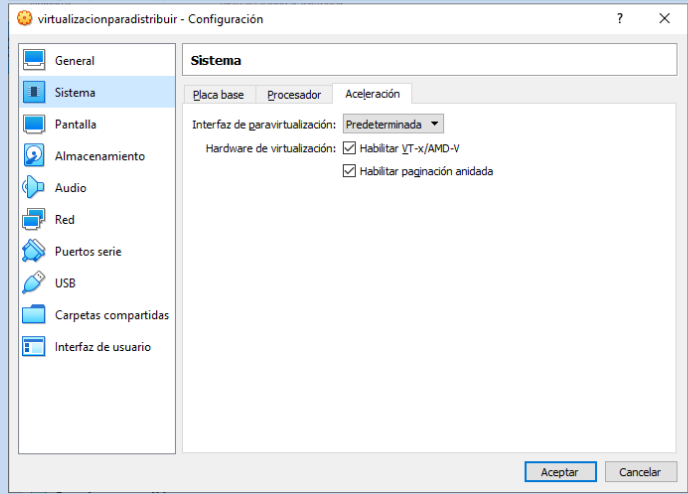
- System -- Acceleration:
I left "Paravirtualization interface" as "Default" (Predeterminado) and left
the two checkboxes below that checked. (Note: my copy of VirtualBox had only
one checkbox here -- "Enable Nested Paging" (Habilitar paginacion anidada).
It didn't have the checkbox "Enable VT-x/AMD-V" (Habilitar VT-x/AMD-V).
Do the best you can here. Not every setting may match the images here, but
they are pretty close. And recall, you must have VT (virtualization) enabled
in your computer's BIOS. Search for instructions for this for the model of
your computer. The BIOS settings will not have the same setup or appearance
on all computers.
- Display (Pantalla): I left video memory at 16MB. Number of monitors: 1.
Left the Scale Factor at Min. Left the Graphic Controller at VMSVGA. Left
the two checkboxes below that unchecked. (My copy of VirtualBox has only
one checkbox, not two, here.)

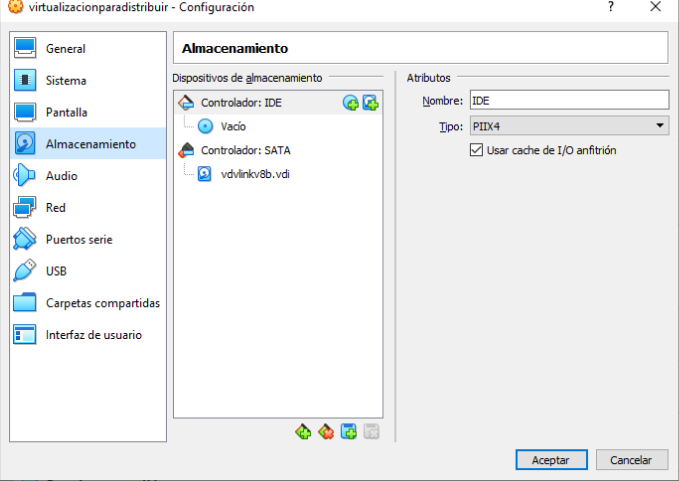
- Storage (Almacenamiento): In the middle column, the name of the VDVLINK file should show up.
It is something like what is shown in the Spanish here, but will be
version 9 not 8. The filename suffix is .vdi. Guest operating systems in
VirtualBox end in .vdi. ... The right-most column should look like what is on
this screenshot. ... (Use Host I/O Cache -- checked. [Usar cache de I/O
anfitrion]).
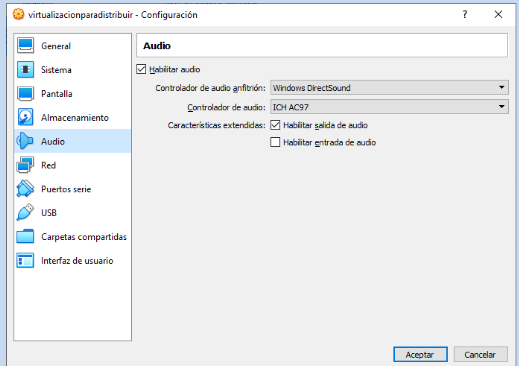
- Audio: Should look like this screen shot. I checked both checkboxes, but
I do not know what effect this has on performance. We do not actually use
an audio input/output on the VM. Audio in/out is handled on the DV-Switch
android client. So I do not know what this audio setting is for.
- "Red" = Network. Network - Adapter 1. Set "Enable Network Adapter"
(Habilitar adaptador de red). Set "Attached to" (Conectado a) Bridged
Adapter (Adaptador puente). Set "Name" (Nombre) to the name of your
computer's network wiFi card.
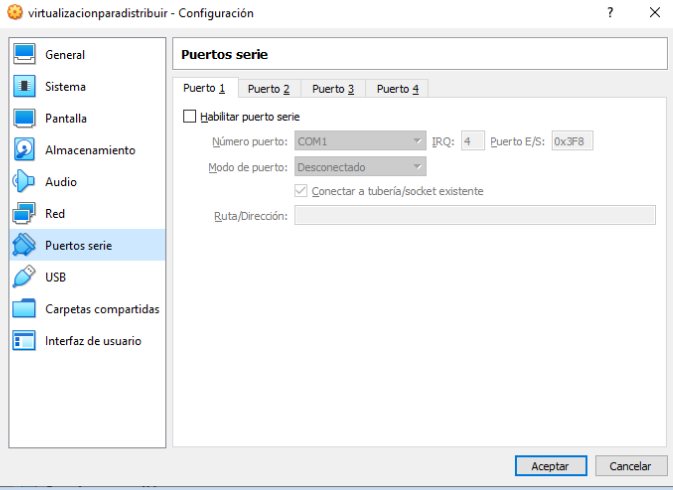
- Serial ports (Puertos serie): Leave as is. Apparently we're not to enable
serial ports. Leave "Enable Serial Port" (Habilitar puerto serie) unchecked.
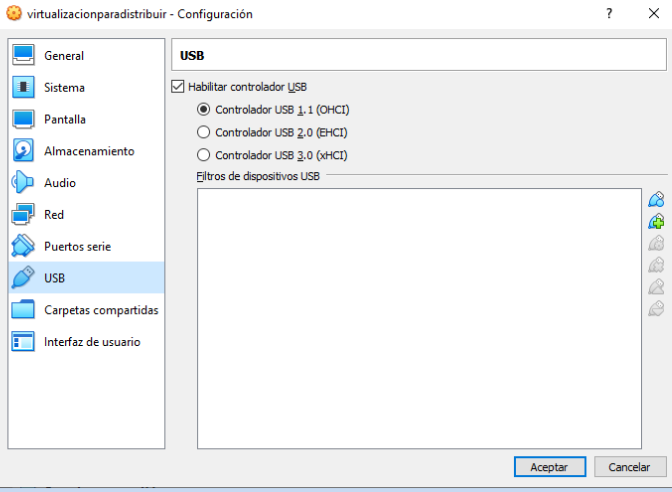
- USB: It shows "USB 1.1" selected, which I don't understand. I set mine to
USB 2.0 but I have no idea if that is the correct setting. I know that, so
far, I've been unable to get a ThumbDV (AMBE) device to work. I may try 1.1
to see if that makes any difference.
- Shared Folders (Carpetas compartidas): skip this.
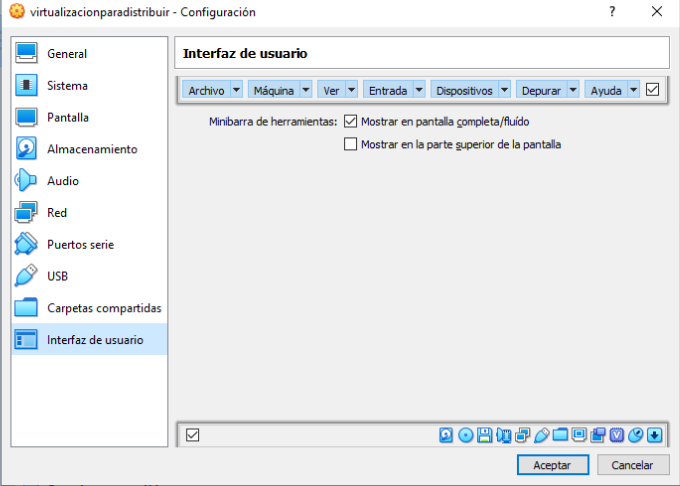
- User Interface (Interfaz de usuario): Check the top checkbox,
"Show in full screen mode" (Mostrar en pantalla completa/fluido).
- This completes the setup of the VDVLINK virtual machine (VM) in
VirtualBox.
Below is the Spanish keyboard layout which you will need to make reference
to, to find the location of the symbols / ' * - _
This is needed in the following section. Also, should you need the # sign,
it is created by holding down Alt-Gr
(the right-Alt key) and hit the numeral 3. Fyew!
In the following section, you will run the virtual machine and
configure VDVLINK. These are the helpful instructions put together by
Dave WA3LXD, modified by me to accommodate this VirtualBox version of DVLINK,
VDVLINK. This is where you will need to make
reference to the Spanish keyboard layout.
When you are "inside" the VM, you are actually inside a separate operating
system (OS), and the keyboard layout for that OS is not the same as the
keyboard layout for your host computer.
Note: "host machine" = your
computer hardware and OS. "Guest machine" = the VM, which in this case is
Debian Linux modified to run VDVLINK.
Quick Setup Guide DVLink by Dave WA3LXD
Modified by Orrin WN1Z for VDVLINK
Image 9.7
As of the date of these instructions, the Virtual image is 9.7.0, but in the
process of following these instructions, you will update it to 9.8.0 (15 July 2020).
-
If you have a DV3000 usb stick insert it into a usb port.
-
Run VirtualBox. Double-click on VDVLINK or whatever you named your VDVLINK
installation. It takes a couple minutes to load and run. Click the Xs to get
rid of the messages pertaining to the keyboard and mouse. Ignore any pesky
error messages during the boot-up process.
Steps to perform after image is running
- login as dvlink
- password is dvlink
- type 'menu' (without the quotes) [enter]
- password: dvlink [enter]
- when grey box credit screen appears and says Salir (quit), hit [enter]
- it asks for yet another password. Enter dvlink again. It then gives
an error message: "Contrasena erronea" (wrong password) and kicks you out
to a command-line. This is fine.
- type: recpass. This will allow you to set a Menu password. Keep going:
- type: menu [enter]
- Salir: [enter]
- It says: "Contrasena no establecida Quieres establecer una ahora?
(Password not set. Do you want to set it now?)
- Hit [enter] for Si (yes)
- It says "Introduzca nueva contrasena" (enter new password). I enter
dvlink, to make all the passwords be dvlink
- [enter]
- Then it says, "Escribe indicativo" or "Enter area code" or
"Enter callsign" (different sub-versions of the app). Enter your callsign
in CAPS.
- Aceptar [enter]
- It should say, "Contrasena establecida dvlink" (Password set to 'dvlink'
if that is the password you set).
- Aceptar [enter] It throws you back to the command-line.
- Type: menu
- It says "Menu Configurador by EA7JCL" (Configuration Menu)
- Salir (Close) [enter]
- Password: dvlink (if that's what you chose)
- Below the blue area of the app it should say: Login correcto
- It should also say: Comprobando versiones (Checking versions)
- Then you're back at the Menu screen. At the upper left corner of
the screen, you should see the VDVLINK version number and an IP address.
If there is no IP address, then you are not connecting to your home
network and something is amiss with your installation.
- Down-arrow to "Salir de DVLINK" (close DVLINK). That takes you
back to the command-line yet again.
Important: Update the program first as follows:
- Before you update, the EA5GVK site says we need to enter a certain
command at a command prompt, related to updating to the latest version.
So, if you are at the DVLINK Menu, down-arrow
to EXIT DVLINK. You will get a command-line prompt.
- Enter the following:
sudo sed -i '$a StrictHostKeyChecking=no' /etc/ssh/ssh_config
This is where you will need to make reference to the Spanish keyboard layout
(see pic above). The hyphen, the apostrophe, the forward-slash / and the
underscore are not in the same places as on an English-US keyboard.
- After you do that, you are still at the command-line.
- Type: menu [enter]
- You will have to enter the system password, then the Menu password.
- Salir (Close) [enter]
- Password: dvlink [enter]. When you type the password, the password
won't appear.
- Again, make sure you have, upper left of the screen, something that
reads like: DVLINK v9.7.0-virtual 192.168.0.50 or whatever IP address
your home router assigns. If there is no IP address, your installation
is not working.
- select "Otras opciones" (Other Options) [enter]
- select "Actualizar DVLINK" (Update DVLINK)[enter]
- enter 'si' [enter]
- [enter]
- [enter]
- You should get a message like "DVLINK Actualizado Correctamente"
(DVLINK updated correctly)
- Aceptar (accept) [enter]
- At the command-line prompt type menu [enter]
- [enter]
- Enter the menu password (such as dvlink). It will not show anything
on the screen. [enter]
- Upper left corner: the version should have upgraded to 9.7.1.
- Repeat this update process until you get to the latest revision as
indicated on top left side of the DVLINK menu (9.8.0 as of 7-10-20) or
until it no longer updates.
- select 'Otras opciones' (Other Options) [enter]
- select 'Cambiar idioma' (Change Language) [enter]
- select desired language [enter]
- select Back [enter]
- select DVSWITCH [enter]
- select DVSWITCH CONFIGURATION [enter]
- select PERSONAL CONFIGURATION [enter]
- highlight the prime user call sign [enter]
- [enter]
- proceed to update (Do not use number pad on keyboard): DMR ID,
NXDN ID (if you don't have one, enter the last 4 of your DMR ID. Also,
you can obtain an NXDN ID from RadioID: https://www.radioid.net/register).
- select AMBE
- select AMBE EMULATOR if you do not have a DV3000 usb stick
- select BACK [enter]
- select USER NETWORKS [enter]
- select your callsign [enter]
- select IP BM [enter]
- select CHOOSE FROM A LIST [enter]
- use keyboard up and down arrow and highlight the server desired
(example: 3101 US or 3103 US) [enter]
- repeat for DMR+ (keep scrolling down the list past the BM servers to
find the DMR+ servers (example: New York) and hblink (suggest tgif.network
far down the list just before XLX lisings) [enter]
- select UPDATING NETWORKS [enter]
- Select BACK [enter]
- select FIELDS OF INFORMATIONS [enter]
- select your callsign [enter]
- select and enter your latitude, longitude, location etc (remember do not
use keyboard number pad)
- select BACK [enter]
- select ACTIVE SYSTEMS [enter]
- select your callsign [enter]
- use up and down arrow keys and enable desired modes using space bar
(it will put a * in the box to indicate selection)
- [enter]
- select Apply Configuration [enter]
- select the user [enter]
- enter to reboot the VM
- when the VM boots back up, enter user dvlink, password dvlink
- now at prompt type 'menu' [enter]
- [enter]
- into the grey box enter the password you created for the menu (it will
not show anything on screen) (my password here is 'dvlink') [enter]
- We also need to check one configuration file error and fix it.
(There could be other config errors, but this is the one I've found so far.)
- From the VDVLINK Main Menu, go down to Exit DVLINK [enter]. This will
kick you out to the command-line prompt. Then type:
- cd /etc
- sudo nano ircddbgateway
- The first line should read: #Configuracion by EA7JCL etc...
- If there is no # at the beginning of that line, it must have one. Put it in.
The # is created with Alt-Gr and then tap the number 3, but not on the numeric
keypad.
- Hit Ctrl-X, Y to save, [enter] and then:
- type: cd
- Terminate the VDVLINK by typing: sudo shutdown -h now
Recall you have to make reference to the keyboard layout to find where the
hyphen - is on the Spanish keyboard.
- You should be back at the VirtualBox Manager screen.
- Double-click on the VDVLINK machine.
- Once the machine is up and running, do the necessary logins, the passwords
are all: dvlink if you set them up that way.
- Type: menu, followed by more password(s)
- Till you get to the VDVLINK main menu
You are now basically done!
Do not forget to port forward 46001 in your router to the network address
for your network VDVLINK virtual machine. (The VDVLINK VM gets its own IP
address, upper left corner, as you may have noticed.)
Also use noip.com or similar dynamic dns service to allow remote access
to the server. (I [WN1Z] use ZeroTier networking.)
DVSWITCH MOBILE Configuration
by Dave WA3LXD
After you download install DVSWITCH MOBILE from the Playstore, open the app
and Select ACCOUNTS tab. Choose an empty account. Set up as follows:
- Protocol: select USRP
- Hostname: is either the local ip address of your server or the name of
your ddns service
- Port AND TX: port is the port number for you call as assigned by the server,
typically 46001 for the primary user (enter this in 2 places)
- Callsign: your call as entered into server
- DMR ID: as entered into the server
- Set the slider for transmit level to under the L in Level
- Set the slider for Receive Level to about 90%
- Codec: leave as SERVER SELECTED
- Press SAVE when done
- Select another empty account and then go select back to the account you
entered the data in while looking a bottom of the screen it should say
'USRP Reg OK' this means you have connected this client to your server.
DVSWITCH Mobile app commands (enter these codes, then press SEND)
by WA3LXD
- *B=BM
- *C=TGIF
- *D=DMR Plus
- *AA=Reboot the VM
- *BB=systemctl restart analog_bridge.service
- *CC=systemctl restart mmdvm_bridge.service
- Long press A to obtain mode change menu
- Long Press B to obtain talk group menu
- To go to TGIF 31665, long-press A, select DMR, then enter *C followed by
SEND, then enter 31665 SEND
- If your device does not have a key pad on the screen go to configure in
the dvswitch mobile app and enter the *C as a macro entry, and then 31665 as
another macro entry.
- In the paid-only version of DvSwitch Mobile, you can enter a macro as a
short cut in order to go to a particular talk group
- For example:
- go to Config on DvSwitch Mobile app
- you will see MACROS
- you can overwrite the existing Macros by typing in the Name (your choice)
and Dial string. For example: to enter a macro for US Texas-Nexus give it a
name and for the dial string enter: ysf.texas-nexus.dyndns.org:42000
(note this is the string that appears in the box when you select the talkgroup
from the menu).
- go back to dialer, long press A, select mode YSF, then use the Macro
dropdown box below the keypad and select the name that you chose above for
the talk group.
- Same as above for DSTAR. Example: for reflector 30C enter REF030CL as
dial string.
- Same as above for DMR just enter the talk group number example 313665
- To change language heard on client
- log into server
- on command line enter: cd /opt/P25Clients/P25Gateway
sudo nano P25Gateway.ini
change language from es_ES to en_US
- cd /opt/NXDNClients/NXDNGateway
sudo nano NXDNGateway.ini
change language from es_ES to en_US
- cd /etc
sudo nano ircddbgateway
change language (almost at bottom of file) from a 7 to a 6
73 Dave WA3LXD
Rev M 02 July 2020 (modified by Orrin WN1Z and adapted to HTML 15 July2020)
73 Orrin WN1Z: revised 15 July 2020